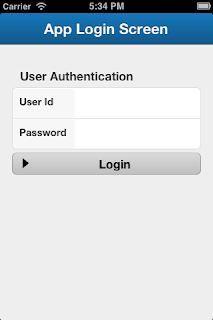
We are going to create a simple application where there will be login screen and when the login is successful it will take the user to the home page. Here are the step by step instructions, you may skip a fews steps depending on your setup.
Step 1: Download and install Xcode from the App Store. Here is the link
Step 2: Install Xcode Command Line Tools. Go to Xcode Preferences -> Downloads.
To unzip you can use the Unarchiver By Dag Agren. Here is the link
https://itunes.apple.com/us/app/the-unarchiver/id425424353?mt=12
Apache Cordova iOS is found under lib/ios
Step 5: Either change your current directory to the bin folder under the lib/ios directory or just drag the bin folder to the Terminal.app icon in your Dock, it should launch a new Terminal window and put set your current directory. The bin folder has the create command that will help us create a new iOS project using phonegap.
Step 6: Type in ./create <project_folder_path> <package_name> <project_name> then press ENTER. For this tutorial just create a new directory named myApps under Documents and then use the following command example
./create ~/Documents/myApps/SenchaTouch2 com.as400samplecode.NativeWebApp NativeWebApp
Tip: The tilde character `~' in UNIX shell indicates user's home directory.
Step 7: The above command will create a new project folder named SenchaTouch2 inside the myApps directory. Find the NativeWebApp.xcodeproj inside the SenchaTouch2 folder and double click that to launch your project in xcode.
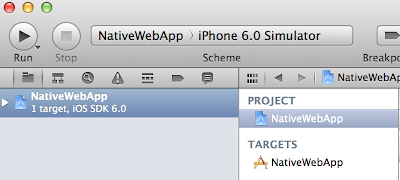
Step 8: Make sure your Target in the Scheme drop-down says NativeWebApp and the Active SDK says iPhone (version) Simulator.
Step 11: This step is very important. Now using finder go into the folder SenchaTouch2 created earlier using Phonegap and find the www folder. Inside the www folder create two folders one named sencha-touch and the other one app. After this find the sencha-touch-all.js and the resources folder in your Sencha Touch installation and copy them both inside the sencha-touch folder that we just created. Please take a look at the image below and your project should look like this in the Xcode.
Step 12: It's time to create our login app and deploy. I am going to create a simple Java Servlet to that will be our backend server authentication so that a registered user can get access to all our services. You can develop your backend using whatever technology your are familiar with such as PHP, .NET, etc. The response to the login request is a JSON object.
package com.as400samplecode;

import java.io.IOException;
import java.io.PrintWriter;

import javax.servlet.ServletException;
import javax.servlet.http.HttpServlet;
import javax.servlet.http.HttpServletRequest;
import javax.servlet.http.HttpServletResponse;

import com.google.gson.JsonObject;

public class Login extends HttpServlet {
 private static final long serialVersionUID = 1L;

 public Login() {
  super();
 }

 protected void doGet(HttpServletRequest request, HttpServletResponse response) throws ServletException, IOException {
  doPost(request,response);
 }

 protected void doPost(HttpServletRequest request, HttpServletResponse response) throws ServletException, IOException {

  String userId = request.getParameter("userId").trim();
  String password = request.getParameter("password").trim();

  PrintWriter out = response.getWriter();
  JsonObject myObj = new JsonObject();

  if(userId.trim().equals("hello") && password.trim().equals("world")){
   myObj.addProperty("success", true);
   myObj.addProperty("message", "Authentication Successful!");
  }
  else {
   myObj.addProperty("success", false);
   myObj.addProperty("message", "Authentication Failed!");
  }

  out.println(myObj.toString());
  out.close();

 }

}
Step 13: Now find the index.html file inside your www folder. Replace the complete source with the following code
<!DOCTYPE html PUBLIC "-//W3C//DTD HTML 4.01 Transitional//EN" "http://www.w3.org/TR/html4/loose.dtd">
<html>
    <head>
        <meta http-equiv="Content-Type" content="text/html; charset=ISO-8859-1">
            <title>MySamplecode.com sencha touch demo</title>
            <link rel="stylesheet" href="sencha-touch/resources/css/sencha-touch.css" type="text/css">

                <script type="text/javascript" src="cordova-2.2.0.js"></script>
                <script type="text/javascript" src="sencha-touch/sencha-touch-all.js"></script>
                <script type="text/javascript" src="js/index.js"></script>
                <script type="text/javascript">
                    app.initialize();
                </script>

    </head>
    <body>

    </body>
</html>
Step 14: Next find the index.js file in your www/js folder. Append the following source code to the end of the file. Do not replace the complete source code as we did in step#13.
Ext.Loader.setConfig({
        enabled: true
});

Ext.application({

        //application name
        name: 'MyApp',

        //application folder
        appFolder: 'app',

        //Asynchronous Loading of dependencies
        requires: [
                   'MyApp.view.MainNavigation',
                   'MyApp.util.Config'
                   ],

        //our main navigation view
        views : ['MainNavigation'],
        //indicate our application controller
        controllers: ['MainController'],

        //application launch getting called automatically when the device is ready
        launch: function() {
        console.log('Application launch');

        //create a container and put our navigation view in full screen
        Ext.create('Ext.Container', {
                   fullscreen: true,
                   layout: 'vbox',
                   items: [{
                           flex: 1,
                           xtype: 'mainNavigation'
                           }]
                   });
        }

});
Step 15: Ready for Model, View and Controller. Well in this simple application there is no model or store. So lets go ahead and create the following folders inside the www/app folder
- controller
- util
- view
Ext.define('MyApp.util.Config', {

        singleton : true,

        config : {
            baseUrl : 'http://localhost:8080/SenchaTouchApp/'
        },

        constructor : function (config) {
            this.initConfig(config);
            this.callParent([config]);
        }

});
Step 17: Next create all our views needed for the app.
MainNavigation.js
Ext.define('MyApp.view.MainNavigation', {
    extend: 'Ext.navigation.View',
    alias : 'widget.mainNavigation',
    id: 'mainNavigation',

    requires: [
               'MyApp.view.Login',
               'MyApp.view.Home'
               ],

    config: {

     navigationBar: {
            ui: 'dark',
            items: []
        },

        items: [{
         title: 'App Login Screen',
            items: [{
                xtype: 'login',
                flex: 1
            }]
        }]
    }


});
Login.js
Ext.define('MyApp.view.Login', {
    extend: 'Ext.form.Panel',
    alias : 'widget.login',

    config: {

     height: 300,
     layout: {
            type: 'vbox',
        },
        defaults: {
            margin: '0 0 5 0'
        },
        items: [
            {
             xtype: 'fieldset',
                title: 'User Authentication',
                items: [
                    {
                        xtype: 'textfield',
                        label: 'User Id',
                        itemId: 'userId',
                        name: 'userId',
                        allowBlank: false,
                        autoCapitalize: false,
                        labelWidth: '33%'
                    },
                    {
                        xtype: 'passwordfield',
                        label: 'Password',
                        itemId: 'password',
                        name: 'password',
                        allowBlank: false,
                        labelWidth: '33%'
                    }
                ]
   },
   {
                xtype: 'button',
                itemId: 'loginButton',
                text: 'Login',
                iconCls: 'arrow_right',
                iconMask: true
            }
        ]
    }

});
Home.js
Ext.define('MyApp.view.Home', {
    extend: 'Ext.Panel',
    alias : 'widget.homePage',

    config: {

     layout: {
            type: 'hbox',
        },
        defaults: {
         margin: '0 0 0 0',
  },
        items: [
            {
                xtype: 'panel',
                html: '<b>Welcome</b><br/>You are now logged in.',
            }
        ]
    }

});
Step 18: Finally our application controller - MainController.js
Ext.define('MyApp.controller.MainController', {
 extend : 'Ext.app.Controller',

 sessionId: null,

 config: {
  profile: Ext.os.deviceType.toLowerCase(),

        refs: {
   myNavigationView: 'mainNavigation',
  },
  control: {
   'panel': {
             painted: 'onPainted',
            },
            'login button[itemId=loginButton]' : {
    tap : 'onUserAuthentication'
   },
   'login textfield' : {
    keyup : 'onLoginKeyUp'
   }
  }
    },

 onPainted: function() {
        console.log('Panel painted in controller');
    },

    onUserAuthentication: function(button) {
     var fieldset = button.up('panel').down('fieldset');
     var userId = fieldset.getComponent('userId');
     var password = fieldset.getComponent('password');
     if(userId.getValue() && password.getValue()){

      Ext.Viewport.mask({
       xtype: 'loadmask',
       message: 'Please Wait ...',
       indicator: false
      });

      Ext.Ajax.request({
             url : MyApp.util.Config.getBaseUrl() + 'Login',
             method:'POST',
             params : {
                 userId: userId.getValue(),
                 password: password.getValue()
             },
             scope : this,
             //method to call when the request is successful
             success : this.onLoginSuccess,
             //method to call when the request is a failure
             failure : this.onLoginFailure
      });
     }
     else {
      Ext.Msg.alert('', 'Please enter User Id and/or Password', Ext.emptyFn);
       }
    },

    onLoginKeyUp: function(field, e, eOpts) {
     if(e.browserEvent.keyIdentifier == 'Enter'){
      var panel = field.up('fieldset').up('panel');
      this.onUserAuthentication(panel.getComponent('loginButton'));
     }
    },

    onLoginFailure : function(err) {
     Ext.Viewport.unmask();
     Ext.Msg.alert('', 'Error connecting to server, please try after some time', Ext.emptyFn);
    },

    onLoginSuccess : function(response, opts) {
     Ext.Viewport.unmask();
        response = Ext.decode(response.responseText);
        if(response.success){
         var navigationView = this.getMyNavigationView();
         var homePage = Ext.widget('homePage',{
          title: 'My Home Page'
         });
         navigationView.setDefaultBackButtonText('Logout');
         navigationView.push(homePage);
        }
        else {
            Ext.Msg.alert('', response.message);
        }
    }

});
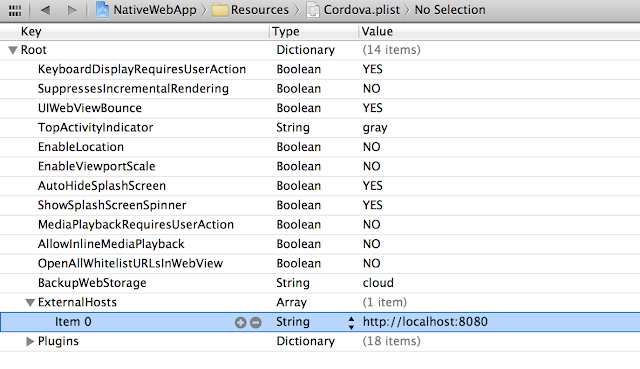
Step 19: Before we run our app we must add an entry to the Cordova.plist inside the Resources folder to allow access to the external host. This entry will depend on where your login application (servlet or PHP) is hosted. This is the same entry as in your Config.js baseUrl property. If your don't specify this in your app you will see the following error in your Xcode console.
NativeWebApp[68698:c07] ERROR whitelist rejection: url='http://localhost:8080/SenchaTouchApp/Login?_dc=1356215504777'


No comments:
Post a Comment
NO JUNK, Please try to keep this clean and related to the topic at hand.
Comments are for users to ask questions, collaborate or improve on existing.