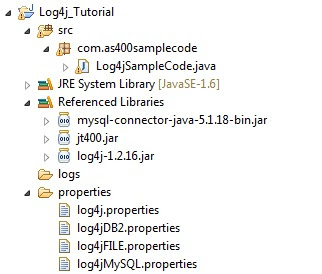
How to setup Log4j for logging to console, file system, DB2 and MySQL database
Log4J is an Open Source logging framework from the apache foundation. It's a Java based framework and can be used in any java program. Log4j is designed with three goals in mind: reliability, speed and flexibility. There is a tight balance between these requirements.Log4j is a tool to help the programmer output log statements to a variety of output targets. In case of problems with an application, it is helpful to enable logging so that the problem can be located. With log4j it is possible to enable logging at runtime without modifying the application binary. The log4j package is designed so that log statements can remain in shipped code without incurring a high performance cost.
Log4j has three main components:
- loggers: Responsible for capturing logging information.
- appenders: Responsible for publishing logging information to various preferred destinations.
- layouts: Responsible to format logging information in different styles.
Logger is the most essential component of the logging process. It is responsible for capturing the logging information. There are various different log levels ...
- ALL All levels including custom levels.
- DEBUG Designates fine-grained informational events that are most useful to debug an application.
- INFO Designates informational messages that highlight the progress of the application at coarse-grained level.
- WARN Designates potentially harmful situations.
- ERROR Designates error events that might still allow the application to continue running.
- FATAL Designates very severe error events that will presumably lead the application to abort.
- OFF The highest possible rank and is intended to turn off logging.
In this tutorial we will see how to use the Log4j logger for various logging levels and log the information to the console, file system, DB2 on AS400 and MySQL database. Before we start you must download the log4j jar file from the Apache website and put that in your project classpath. Here is the link - http://logging.apache.org/log4j/1.2/download.html
Sample Java program to demonstrate logging Log4jSampleCode.java
package com.as400samplecode;

import java.io.PrintWriter;
import java.io.StringWriter;

import org.apache.log4j.Level;
import org.apache.log4j.Logger;
import org.apache.log4j.PropertyConfigurator;

public class Log4jSampleCode {

    private static Logger logger;

    public static void main(String[] args) {

        //Allows the configuration of log4j from an external file.
        PropertyConfigurator.configure("properties/log4j.properties");

        //This is the central class in the log4j package.
        //Most logging operations, except configuration, are
        //done through this class.
        logger = Logger.getLogger(Log4jSampleCode.class);

        //Log a message object with the INFO Level.
        logger.info("Put your Log4j Information messages here");

        //Log a message object with the WARN Level.
        logger.warn("Put your Log4j Warning messages here");

        //This generic form is intended to be used by wrappers.
        //You can set the priority and the message
        logger.log(Level.TRACE, "Here we go a Log4j trace message");

        //Log a message object with the DEBUG level.
        logger.debug("Put your Log4j debug information here");

        // Exception logging example:
        try{
            String logError = "log4j".substring(6);
        }catch (Exception e){
            //Log a message object with the ERROR Level.
            logger.error("Log4J error: " +  getFullStackTrace(e));
        }

    }

    public static String  getFullStackTrace(Throwable throwable) {
        StringWriter sw = new StringWriter();
        PrintWriter pw = new PrintWriter(sw, true);
        throwable.printStackTrace(pw);
        return sw.toString();
   }

}
For logging to work you need configure the log4j properties file which has all the information about the logging level, appender and layout. With the help of the properties file you can change the logging level, switch on or off logging at anytime, send the logs to console or file system. Here are a few examples of log4j.properties files that you can use for different situations based on your need.
Sample log4.properties file to send logs to your console
# Root logger option
log4j.rootLogger=INFO, stdout

# Direct log messages to stdout
log4j.appender.stdout=org.apache.log4j.ConsoleAppender
log4j.appender.stdout.Target=System.out
log4j.appender.stdout.layout=org.apache.log4j.PatternLayout
log4j.appender.stdout.layout.ConversionPattern=%d{ABSOLUTE} %5p %c{1}:%L - %m%n
Sample log4.properties file to send logs to file system
# Define the root logger with appender file
log4j.rootLogger = DEBUG, FILE

# Define the file appender
log4j.appender.FILE=org.apache.log4j.RollingFileAppender
# Set the name of the file
log4j.appender.FILE.File=logs/myLogs.txt

# Set the immediate flush to true (default)
log4j.appender.FILE.ImmediateFlush=true

# Set the threshold to debug mode
log4j.appender.FILE.Threshold=debug

# Set the append to false, should not overwrite
log4j.appender.FILE.Append=true

# Set the maximum file size before rollover
log4j.appender.FILE.MaxFileSize=5KB

# Set the the backup index
log4j.appender.FILE.MaxBackupIndex=2

# Define the layout for file appender
log4j.appender.FILE.layout=org.apache.log4j.PatternLayout
log4j.appender.FILE.layout.conversionPattern=%m%n
Sample log4.properties file to send logs to DB2 database on AS400
# Define the root logger with appender file
log4j.rootLogger = DEBUG, DB

# Define the DB appender
log4j.appender.DB=org.apache.log4j.jdbc.JDBCAppender

# Set JDBC URL
log4j.appender.DB.URL=jdbc:as400://localhost;naming=system;errors=full;

# Set Database Driver
log4j.appender.DB.driver=com.ibm.as400.access.AS400JDBCDriver

# Set database user name and password
log4j.appender.DB.user=UserId
log4j.appender.DB.password=Password

# Set the SQL statement to be executed.
log4j.appender.DB.sql=INSERT INTO myLogs VALUES('%X{User}','%d{yyyy-MM-dd HH:mm:ss}','%C','%p','%m')

# Define the layout for file appender
log4j.appender.DB.layout=org.apache.log4j.PatternLayout
Please Note: You must use real userid and passwords. Also if needed change localhost to IP address or domain name. In addition to that download jt400.jar and put that in your project classpath.
Sample log4.properties file to send logs to MySQL database
# Define the root logger with appender file
log4j.rootLogger = DEBUG, DB

# Define the DB appender
log4j.appender.DB=org.apache.log4j.jdbc.JDBCAppender

# Set JDBC URL
log4j.appender.DB.URL=jdbc:mysql://localhost:3306/world

# Set Database Driver
log4j.appender.DB.driver=com.mysql.jdbc.Driver

# Set database user name and password
log4j.appender.DB.user=root
log4j.appender.DB.password=mysql

# Set the SQL statement to be executed.
log4j.appender.DB.sql=INSERT INTO myLogs VALUES('%X{User}','%d{yyyy-MM-dd HH:mm:ss}','%C','%p','%m')

# Define the layout for file appender
log4j.appender.DB.layout=org.apache.log4j.PatternLayout
Please Note: You must download Java MySQL connector jar file and put that in the project classpath.
SQL create Table statement for the LOG file
CREATE TABLE myLogs (
   USER_ID  varchar(20) NOT NULL,
   LOG_DATE  date NOT NULL,
   LOGGER  varchar(50) NOT NULL,
   LEVEL  varchar(10) NOT NULL,
   MESSAGE  varchar(1000) NOT NULL
)


No comments:
Post a Comment
NO JUNK, Please try to keep this clean and related to the topic at hand.
Comments are for users to ask questions, collaborate or improve on existing.