This tutorial covers the following topics
ExtJs MVC Architecture
- Model
- Store
- View
- Controller
ExtJs Ajax Request
ExtJs Grid
- Includes Paging Toolbar
ExtJs Window
- Add and Edit buttons
Java Servlet
- Java Bean to JSON conversion
- JSON to Java Bean conversion
- JSON Request and Response
- Capture Http Request Payload
Ext JS 4 comes with a new application architecture that not only organizes your code but reduces the amount you have to write. It introduces the concept of controller into the design of the application. Controllers are the glue that binds an application together. All they really do is listen for events, usually from views and take some action. Controllers have access to models, stores and views. It reduces the app level events that you have fire from each component in case you decide to break up your code in more manageable portion. In short, if you are going to design a Enterprise Level Web Application MVC is the way to go.
Snippet of ExtJs controller
Ext.define('IN.controller.Items', {
            extend : 'Ext.app.Controller',

            stores : ['Items'],
            models : ['Item'],
            views : ['item.List', 'item.Edit', 'item.MyNumberField'],

            init: function() {
               console.log('Initialized! This happens before the Application launch function is called');
           }
});
The init function is a special method that is called when your application boots. It is called before the Application's launch function is executed so gives a hook point to run any code before your Viewport is created.
The init function is a great place to set up how your controller interacts with the view, and is usually used in conjunction with another Controller function - control. The control function makes it easy to listen to events on your view classes and take some action with a handler function.
ExtJs 4 MVC architecture consists of the following
- Model is a collection of fields and their data (e.g. a User model with username and password fields). Models know how to persist themselves through the data package, and can be linked to other models through associations. Models work a lot like the Ext JS 3 Record class, and are normally used with Stores to present data into grids and other components
- View is any type of component - grids, trees and panels are all views.
- Controllers are special places to put all of the code that makes your app work - whether that's rendering views, instantiating Models, or any other app logic
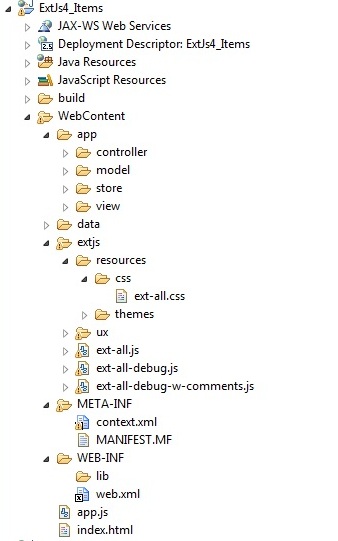
In this tutorial we are going to create a Item Maintenance program that interacts with the back-end server for Loading data into a Grid and then let it Add/Update Items from the Grid. I use Eclipse as my IDE and created a Dynamic Web Project named ExtJs4_Items. After you create the project add the folders within WebContent as shown below.
Next copy all the folders and the files from your ExtJs 4 installation directory inside the WebContent > extjs folder.
To setup the web environment first create the context.xml file inside the META-INF.
Step 1: Sample context.xml file for your JDBC connection to the Database is given below
<?xml version="1.0" encoding="UTF-8"?>
<Context reloadable="true">
<Resource auth="Container"
name="jdbc/mydb2"
type="javax.sql.DataSource"
driverClassName="com.ibm.as400.access.AS400JDBCDriver"
url="jdbc:as400://{ip_address};naming=system;errors=full;"
username="{user_id}"
password="{password}"
maxIdle="10"
maxActive="200"
maxWait="5"
removeAbandoned="true"
removeAbandonedTimeout="1200"
/>
</Context>
Step 2: Source for the web.xml
It contains the config for the servlet ItemMaintenance and the JDBC resource.<?xml version="1.0" encoding="UTF-8"?>
<web-app xmlns:xsi="http://www.w3.org/2001/XMLSchema-instance" xmlns="http://java.sun.com/xml/ns/javaee" xmlns:web="http://java.sun.com/xml/ns/javaee/web-app_2_5.xsd" xsi:schemaLocation="http://java.sun.com/xml/ns/javaee http://java.sun.com/xml/ns/javaee/web-app_2_5.xsd" id="WebApp_ID" version="2.5">
<display-name>ExtJs4_Items</display-name>
<welcome-file-list>
<welcome-file>index.html</welcome-file>
<welcome-file>index.htm</welcome-file>
<welcome-file>index.jsp</welcome-file>
<welcome-file>default.html</welcome-file>
<welcome-file>default.htm</welcome-file>
<welcome-file>default.jsp</welcome-file>
</welcome-file-list>
<servlet>
<description>Item Maintenance</description>
<display-name>ItemMaintenance</display-name>
<servlet-name>ItemMaintenance</servlet-name>
<servlet-class>com.as400samplecode.ItemMaintenance</servlet-class>
</servlet>
<servlet-mapping>
<servlet-name>ItemMaintenance</servlet-name>
<url-pattern>/ItemMaintenance</url-pattern>
</servlet-mapping>
<resource-ref>
<description>DB2 Datasource</description>
<res-ref-name>jdbc/mydb2</res-ref-name>
<res-type>javax.sql.DataSource</res-type>
<res-auth>Container</res-auth>
<res-sharing-scope>Shareable</res-sharing-scope>
</resource-ref>
</web-app>
Next in line is the index.html file inside the WebContent Folder. This is the starting point of your application. index.html file contains the page title for the application and references to the ExtJs stylesheet and JavaScript files. In addition to that it has the app.js that we need to still define and will contain our application.
Please note that we left the html body element empty.
Step 3: Source for index.html
<html>
<head>
    <title>Item Maintenance</title>

    <link rel="stylesheet" type="text/css" href="extjs/resources/css/ext-all.css">

    <script type="text/javascript" src="extjs/ext-all-debug.js"></script>
    <script type="text/javascript" src="app.js"></script>

</head>
<body></body>
</html>
Click here for next Chapter

No comments:
Post a Comment
NO JUNK, Please try to keep this clean and related to the topic at hand.
Comments are for users to ask questions, collaborate or improve on existing.